
I2S Rail Line at a Glance
- Reserved corridor. A 24.62 km strip from West Ipswich to Springfield is already in State hands.
- One proper tunnel, many k’s of “sky” train bridges & viaduct. Just 0.475 km is roofed under the Centenary/Augusta interchange; about 4.9 km ride on flood-proof viaducts and the balance is ground-level cut or fill.
- Nine new stations. Two tracks and nine universally accessible stops put every growth suburb between the two CBDs within a short walk or feeder-bus hop of rail.
Imagine stepping onto a train at Ipswich. And gliding to Springfield Central in 19 minutes.
No highway log-jams, no flood closures, just a straight shot through one of Australia’s fastest-growing corridors.
Carved mostly at ground level, the new rail line exiting Springfield Central towards Ipswich Central dives beneath the Centenary Highway–Augusta Parkway interchange. Goes through a 475 m tunnel. And soars on viaducts over Woogaroo, Bundamba and Deebing Creeks.
9 new stations. 3,950 park-and-ride bays. And seamless bus and bike links will knit places like Yamanto, Ripley and Deebing Heights into the region’s rail network.
By 2034—after a 4-year build—the line is forecast to serve a catchment of 275,000 people, halving typical door-to-door trip times and pulling 1,000s of cars off the Centenary and Cunningham highways.
What follows is a plain-English tour of the engineering, stations, timelines and dollars behind Queensland’s next big rail link—every figure straight from the Environmental Impact Study, updated to 2025 money, with no jargon required.
🛤️ Route & Structures

I2S new rail line in black. Yellow dots are new stations.
Highlight
About 19 km run in cut or fill; 4.9 km of bridges leap creeks, roads and highways, and a single 475 m tunnel slides under the Centenary / Augusta loops straight into the existing Springfield Central Station.
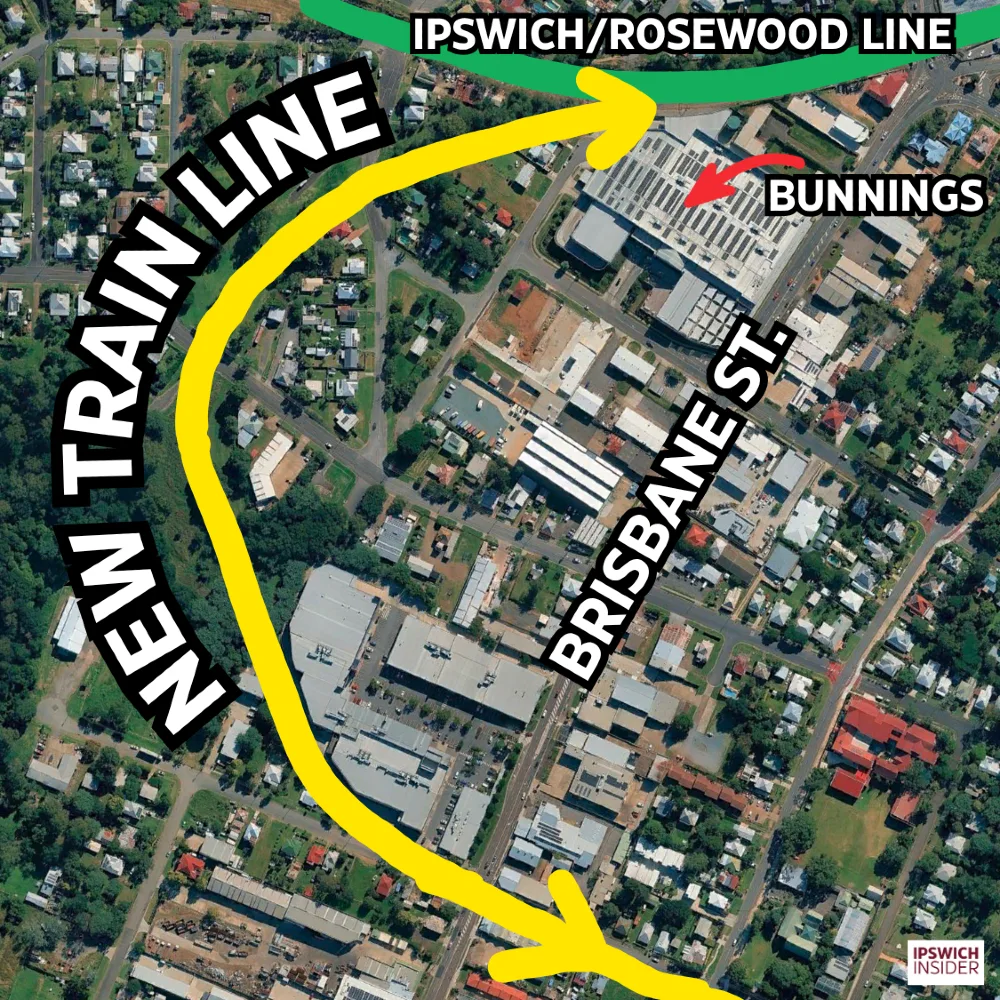
Ipswich-Rosewood main-line turn-out → Keogh St/Brisbane St corner (0.00 – 0.45 km)
- The new Ipswich-Springfield rail line starts behind Bunnings in West Ipswich. Branching off and moving SW off the Ipswich-Rosewood line. It immediately climbs onto structure to go over Tiger St and loop around the back of Spotlight to go overtop Keogh St and Brisbane St.
- Spotlight corner → Brisbane St (0.45 – 0.85 km).
Still climbing, the track reaches 6 m height to fly over busy Brisbane St.
🏗️ Tiger / Keogh Over-Bridge (≈ 80 m total)
- One continuous deck keeps both local lanes open 24 / 7—no level crossings.
- Fits inside the 20 m pinch between shop car-parks and the freight loop fence.
🏗️ Brisbane St Over-Bridge (≈ 60 m)
- Keeps 18,000 vehicles / day moving beneath; grade continues at 2 % toward the campus.
- Pier placement avoids heritage shop veranda zones.
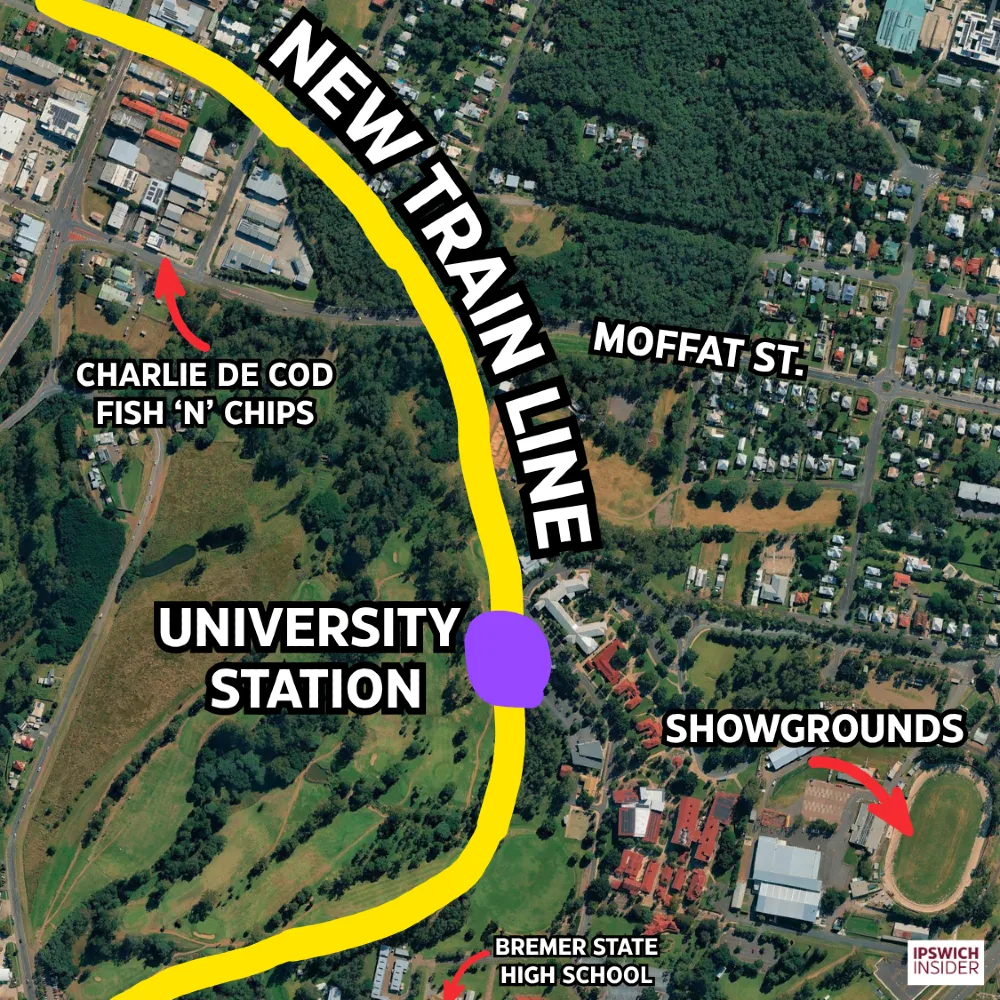
Brisbane St → Moffatt St → University station (0.85 – 1.90 km)
- The deck stays high to cross Moffatt St, then drops to shallow fill along the Sandy Gallop Golf Club fence, arriving at the western edge of the UniSQ campus.
🏗️ Moffatt St Over-Bridge (≈ 50 m)
- Rail line comes down to earth as it reaches USQ campus on the SW corner of Willey St Park.

Across Deebing Creek to Berry St (1.90 – 4.35 km)
- From the campus the line mounts a 1.7 km viaduct, gliding above Deebing Creek, Lobb St and the Bremer, before touching down just north of Berry St.
- Hall St & Yamanto (4.35 – 6.10 km).
Low fill and three mini-bridges feed the tight Yamanto station site behind the Yamanto Central car park on Kuril Dr.
🏗️ Deebing–Bremer Mega-Viaduct (1.7 km)
- One deck crosses two creeks and an arterial with no piers in soft alluvium.
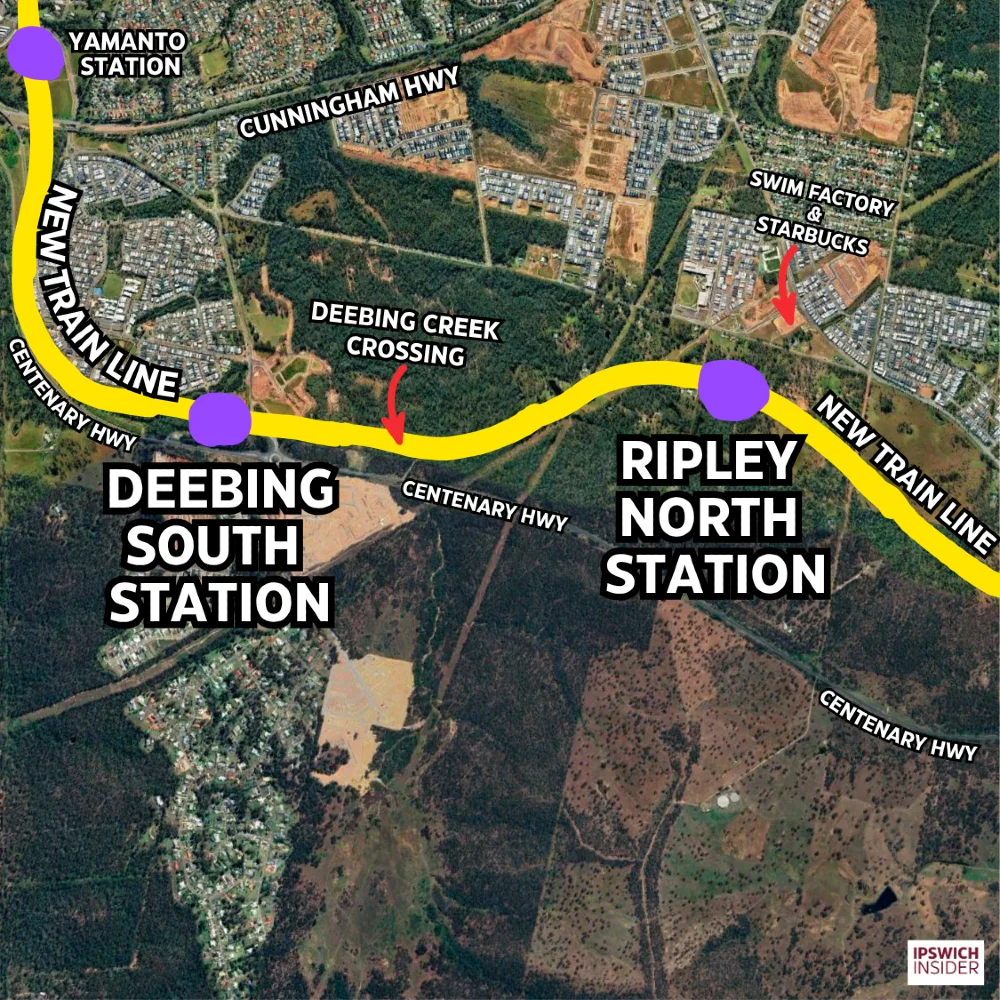
Under the Cunningham Hwy (6.10 – 7.80 km)
- Track dives beneath the highway, resurfaces for 700 m, then drops again toward Deebing South.
- Deebing South → Ripley North (7.80 – 11.40 km).
800 m viaduct, brief fill, 260 m Deebing Cr bridge, then trenched running to Ripley North.
🏗️ Deebing Flood-Plain Structures
- 800 m Ripley Viaduct rises above Q100 flood storage.
- 260 m Deebing Cr Bridge clears the channel and fauna corridor without in-stream piers.
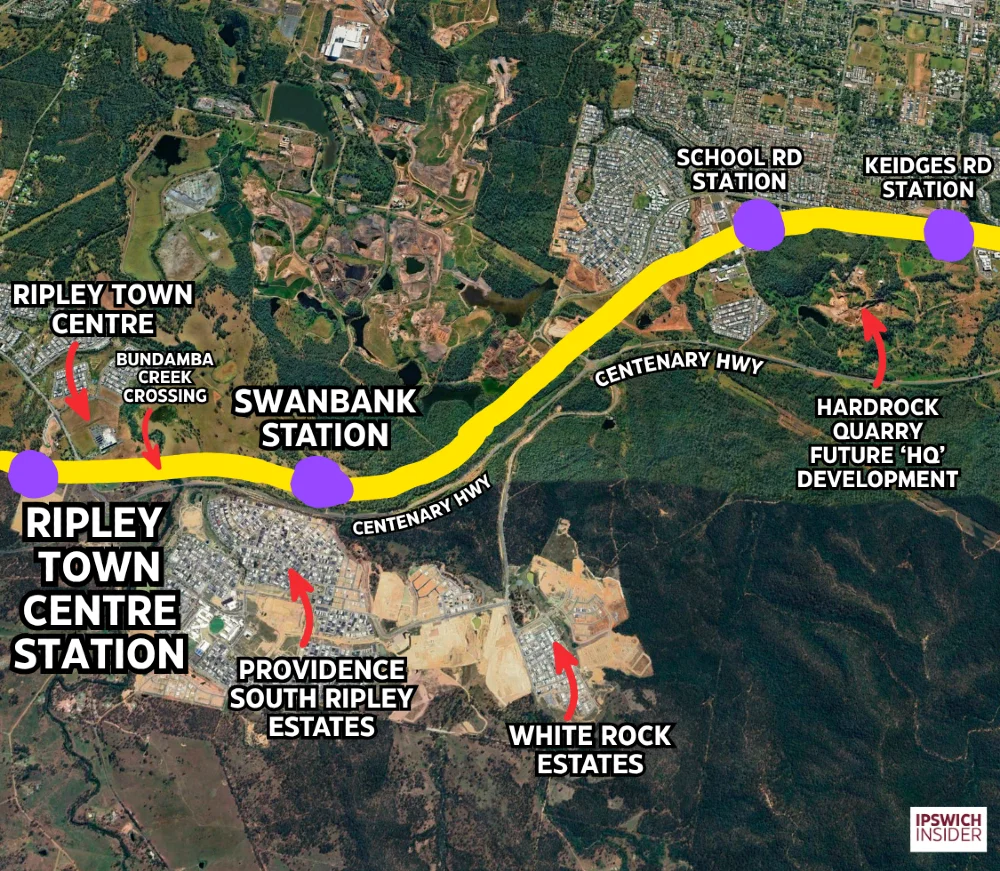
Ripley Town Centre trench (11.40 – 13.30 km)
- Rails stay in a deep cutting passing just south of the new (still being built in 2025) Ripley Police HQ. While moving towards the front of Ripley Town Centre / Coles, where its proposed Ripley Town Centre station will be. All while letting future town-centre streets bridge overhead without level crossings.
- Bundamba Creek & Swanbank (13.30 – 15.15 km).
The line rises on a ~310 m girder viaduct SE of the Ripely Town Centre and across Bundamba Creek wetlands, then dips into Swanbank station that will service South Ripley Providence and White Rock Estates. - Swanbank → School Road (15.15 – 19.65 km).
A mix of shallow fills, two deep rock cuttings (under Cumner Road and the Swanbank interchange) and five micro-bridges brings trains to School Road station serving the SW corner of Redbank Plains . - Deep cut to Keidges Road (19.65 – 21.30 km).
Up to 21 m trench threads moving along the entrante to Hardrock Quarry and opens at the south end of Keidges Road just beside Woogeroo Creek State School for the new station.
🏗️ Bundamba Creek Viaduct (≈ 310 m)
- Piers kept clear of heritage mine shafts and riparian vegetation; deck sits 1.2 m above 1 % AEP flood.
🏗️ Swanbank–School Rd Micro-Decks (≈ 250 m total)
- Five spans under 200 m leap quarry haul-roads and seasonal drains where deeper cut was uneconomic.

Keidges Road, Woogaroo Creek & motorway lead-in (21.30 – 24.15 km)
- A 320 m deck sails over Keidges Road / Purser Rd and Woogaroo Creek, then shifts between cut and fill moving towards south side of the new World Gym, Total Tools Springfield and National Storage as it enters the South-West Transport Corridor reserve.
🏗️ Keidges–Woogaroo Over-Bridge (≈ 320 m)
- Single deck avoids road lowering and keeps rails above creek flood-waters.

Centenary/Augusta cut-and-cover tunnel (24.15 – 24.62 km)
- Right alongside Exit 33 from the Centenary the Rails duck 6 m below ground for a ~475 m concrete box under the Centenary Hwy / Augusta Pkwy loops. They pop out the other side perfectly aligned to roll into the existing Springfield Central Station platforms.
Over-Pass Tally (whole corridor)
- Total “structure” length = 4.915 km (EIS Table 5-5); about 19 km stay in balanced cut or fill.
🚉 Stations & Access
Highlight
9 stations, 5 of them transit hubs, knit rail into the bus and bike networks while shaping new town centres.
- Key hubs. University, Yamanto, Ripley North, Ripley Town Centre, School Road are flagged for high-frequency bus interchange and larger concourses.
- Standard stops. Berry Street, Deebing South, Swanbank, Keidges Road get simpler shelters and ticketing but full accessibility.
- Platform length 215 m. Every station berths a 175 m six-car train with 20 m safety clearances at each end.
- Universal access. Lifts, tactile tiles and hearing loops meet Disability Discrimination Act rules everywhere.
- Park-and-ride mix. Capacities range from 50 bays at public transit focused Yamanto up to 1,500 at Keidges Road; Swanbank and Deebing South each host 1,000-bay lots.
- Train-first neighbourhood candidates. Yamanto plus the two Ripley stops are earmarked for dense “urban village” zoning within an 800 m walk.
- Cycle reach. Covered bike parking links into the Regional Cycle Network at School Road and Keidges Road.
- Bus integration. Feeder routes loop through forecourts; timetables will be co-ordinated in the TransLink plan.
- Station hierarchy. Key hubs add toilets, staff rooms and real-time screens; standards rely on remote CCTV and help-points.
- Keidges Road fly-over. Track rises onto girders to clear Keidges Road and Woogaroo Creek just east of the platform.
- Future Berry infill. A safeguarded site 800 m south-west of University can be activated once inner-south demand grows.
- University event gateway. The campus stop doubles as Ipswich Showgrounds entry point for local events.
🏗️ Build & Environment
Highlight
5 work fronts over 4 years, strict ecological rules and only 143 affected properties keep impacts small and temporary.
- Property impacts limited. 143 titles—mostly industrial or future-urban land—need part or whole resumption; only ten low-density homes are inside the corridor.
- Utilities allowance. About $30 m moves major pipes, HV feeders and oil lines the route crosses.
- 5 work zones. Crews begin at Ipswich, Springfield and three middle sections, so no suburb hosts heavy works longer than 18 months.
- Flood staging. Cofferdams and bridge spans are sized for nil-afflux on Bremer, Bundamba and Deebing creeks.
- Noise caps. Night work is limited to bridge drops and tunnel pours; daytime EIS caps sit at 65 dB(A) with tighter limits after 6 pm.
- Erosion controls. Dispersive Gatton Sandstone cuttings get soil-nailed faces and floc-assisted sediment ponds.
- Koala protocols. Spotter-catchers clear fauna before felling; 25,000 offset trees go in along Bundamba Creek.
- Vegetation offsets. ‘Of concern’ regional ecosystems removed are replaced hectare-for-hectare in the same bioregion.
- Dust & haul roads. A private haul track inside the corridor keeps spoil trucks off suburban streets; water-cannon suppression curbs dust.
- Retaining walls 7.4 km. High cuts near Cumner Road and Swanbank interchange get soil-nail shotcrete walls.
- Completion window. If the Detailed Business Case now under way wins funding by 2028, civil works could span 2029-33. With systems, testing and first passenger trains in 2034.
- Construction hours. Standard site time is 6 am-6 pm; after-hours work requires specific council permits.
➡️ Benefits & Next Steps
Highlight
Faster trips, fewer car kilometres and certainty for Ripley-Ipswich growth before the Detailed Business Case lands.
- Travel time ≤ 20 min. 120 km/h running south of Yamanto and 90 km/h into Ipswich should deliver Springfield–Ipswich in about 19 minutes.
- Patronage ready. Deebing South alone is modelled for 1,850 daily boardings in 2026, rising above 4,000 by 2051.
- Modal switch. Big park-and-rides intercept cars before they clog the Centenary or Cunningham highways.
- Supports Ripley PDA. Two Ripley stations anchor a structure plan for 120,000 new residents.
- Public transport first. Yamanto’s main-street blueprint relies on its station as the public-transport core.
- Bus network leverage. Near-zero transfer times slot the line into existing TransLink fare zones.
No flood closure risk.
Track sits above Q100 level or on viaduct, so services roll when roads flood.
- Economic development. Swanbank’s 1,000-bay lot doubles as worker parking for the future industrial hub.
- Property certainty. Locked-in corridor avoids future tunnelling through built-up suburbs.
- Integrated with SWTC. Rail earthworks share benches with the gazetted South-West Transport Corridor highway extension.
Business-case ready.
The 2008 EIS provides the baseline; the Detailed Business Case (DBC) due 2027 will update costs and staging.
- Funding pathway. Once the DBC verifies cost/benefit, Queensland and Commonwealth can slot cap-ex into 2028-29 budgets.
🚜 Staging & Delivery
Highlight
3 sequential stages let work start at both ends, match greenfield demand and spread cap-ex across two budgets.
- Three-step rollout. Stage 1: West Ipswich→Yamanto and Springfield→School Road (11.3 km); Stage 2: Yamanto→Ripley (7.15 km); Stage 3: Ripley→School Road via Swanbank (6.15 km).
- Stage 1 price-tag. Two end pieces first cost A$ 651 m rail (≈ A$ 990 m 2025) or A$ 477 m bus (≈ A$ 725 m 2025) and open service to UniSQ and Springfield Town Centre early.
- Stage 2 price-tag. The 7.15 km middle-west link across the Cunningham Hwy costs A$ 411 m rail (≈ A$ 625 m 2025) and waits for Yamanto housing uptake.
- Stage 3 price-tag. The final 6.15 km eastern link through Swanbank needs A$ 353 m rail (≈ A$ 537 m 2025) and aligns with Ripley industrial releases.
- Dual work fronts. Starting at both Ipswich and Springfield halves programme time and caps local disruption at ~18 months.
- Early-works sweet-spots. Fast-tracking Kerners Road and Centenary tie-ins lets main civil teams roll straight through later.
- Temporary stabling. Trains stable west of Ipswich and east of Springfield until the middle section joins.
- Flood-season planning. Bridge footings pour in the dry months to curb wet-weather delays.
- Community traffic control. Short rolling closures beat long detours where haul roads cross public streets.
- Why stage? Early rail access kick-starts TODs (transit-oriented developments), cuts highway load sooner and spreads the ≈ A$ 2.3 b (2025) cap-ex over two State budgets.
- Progressive commissioning. Each stage opens to passengers as soon as signals and power are complete.
- Corridor hand-back. Landscaping and fencing follow track completion within six months, leaving a finished green edge.
💰 Cost & Funding
Highlight
The June-2008 capital line-item of A$ 1.19 b inflates to about A$ 2.3 b in 2025 money once compliance and risk are added.
- Original bottom-line. Volume 6 priced the nine-station heavy-rail scheme at A$ 1.186 b (June-2008), including 15 % contingency.
- Where it all went. Track & civils 46 %, structures 22 %, stations 16 %, power 6 %, signalling 4 %, property & management 6 %.
- Inflating to 2025. ABS CPI × 1.52 lifts that to ≈ A$ 1.81 b in today’s purchasing power.
- Modern compliance. New accessibility and fire-life-safety rules add ~13 % to station and tunnel costs—total now ≈ A$ 2.06 b.
- Risk & design uplifts. TMR’s DBC template adds 15 % project-risk + 5 % design-development → ≈ A$ 2.3 b P50 planning figure.
Out-turn dollars.
Spending 2029-33 and indexing 3 % p.a. pushes the Treasurer’s cheque to:
≈ A$ 2.6 b when shovels hit dirt.
- Split the bill. The SEQ City Deal tags 50 % Commonwealth, 50 % State; council contributes land, not cap-ex.
- Cost per kilometre. ≈ A$ 94 m/km—mid-range for recent Australian suburban rail jobs.
- Operating bill. Volume 16’s $46 m OPEX (2008) becomes ≈ $70 m / year (2025); farebox should cover around 60 %.
- Benefit–cost ratio. With CPI-uprated cap-ex, BCR still lands near 1.35: every $1 spent returns $1.35 in benefits.
Funding clock.
DBC done 2027 → cabinet 2028 → budget line 2029 → four-year build → first trains 2034.
- Value-capture kicker. A local TOD levy at Ripley and Yamanto could trim ≈ $60 m off State outlay over the first decade.
ℹ️ What We Know About the I2S Rail Line Detailed Business Case (DBC)
Quick links to the latest official project pages and factsheets:
I2S Detailed Business Case — Project Card
I2S Options Analysis — Project Card
Options Analysis Milestones (SEQ City Deal)
- Purpose. Prepare a Detailed Business Case for a “high-capacity public-transport corridor between Ipswich Central and Springfield Central.”
- Program flag. Listed under the SEQ City Deal theme “A faster, more connected SEQ region.”
- Total DBC budget. A$ 7.5 million. (See links above)
- Funding split. Commonwealth A$ 3.375 m (45 %) · Queensland Government + Ipswich City Council A$ 4.125 m (55 %).
- Schedule. Mid-2025 → mid-2027 (24-month work window).
- Pre-DBC step. Options Analysis / Preliminary Evaluation under way, slated to finish Q2 2024; its preferred option feeds into the DBC.
- Scope notes. Update demand forecasts and staging since the 2008 EIS, refresh capital / operating costs, and—if warranted—compare heavy-rail, light-rail or trackless-tram variants.
- No released deliverables yet. TMR confirms no concept renders or cost tables will be public until the DBC is endorsed.
- Next public milestone. First half 2025: governments plan a project-update bulletin when the DBC consultancy is awarded and scope finalised.
- Why only a line-item today. All information is still held in the City-Deal program register; the DBC proper hasn’t started, so no reports, maps or meeting minutes appear on public TMR or council sites.
📥 Project Documents
🗺️ Ipswich–Springfield Rail Corridor – Interactive Project Map
ArcGIS Dashboard published by the Australian Government’s Infrastructure Data Portal. It centres a zoomable map on the protected rail corridor, plots the line in green with station dots, and pops out a side-panel showing the project ID (121031-22QLD-NP), funding status and $7.5 m Detailed Business Case budget details.
Note: Clicking a link below ↓ will download the PDF to your Downloads folder and open it in your browser.
📄 Executive Summary
Eight-page snapshot of the preferred corridor, headline costs and key environmental impacts.
📄 Volume 1 – Overview & Background
Study objectives, legislative framework and the historic route-selection process.
📄 Volume 2 – Project Drawings & Long-Sections
Plan sheets (1 : 2 000) and long-sections showing every bridge, cutting and station box.
📄 Volume 4 – Background Studies
Earlier investigations and demand forecasts that fed into the EIS scope.
📄 Volume 5 – Description of the Preferred Corridor
Turn-by-turn narrative of the 24.62 km alignment with earthworks and station layouts.
📄 Volume 6 – Feasible Alternatives
Compares heavy-rail, light-rail and busway options; explains the preferred choice.
📄 Volume 7 – Land Characteristics
Soils, geology, contamination risk and groundwater data for cut-and-fill design.
📄 Volume 8 – Water (Surface-Water & Flooding)
Hydrology and flood-model results for creeks and the Bremer River.
📄 Volume 9 – Air Quality
Baseline particulate data and dispersion modelling for construction emissions.
📄 Volume 10 – Noise & Vibration
Existing sound levels, construction caps and operational rail-noise projections.
📄 Volume 11 – Biological Environment
Flora-fauna surveys, koala habitat mapping and vegetation-clearing footprint.
📄 Volume 12 – Land-Use & Planning
Zoning, growth overlays and transit-oriented development plans for each station.
📄 Volume 14 – Socio-Economic Assessment
Population growth, labour-market access and cost-benefit analysis inputs.
📄 Volume 16 – Traffic & Transport
Patronage forecasts, highway-relief modelling and service-frequency assumptions.
📄 Volume 17 – Community & Stakeholder Communication
Consultation methods, issues raised by residents and how feedback shaped the route.
📄 Volume 20 – References
Complete bibliography of data sources, standards and legislation cited in the EIS.
📄 Glossary & Abbreviations
Quick lookup for technical rail, environmental and planning terms.
📄 Appendix A – Scope of Works / REF Summary
Detailed requirements and Review-of-Environmental-Factors summary.
📄 Appendix C – Yamanto Drawings Part 1
Large-format station, underpass and geometry sheets for the Yamanto precinct (1 / 3).
📄 Appendix C – Yamanto Drawings Part 2
Continuation of Yamanto detailed drawings—bridge elevations and service relocations.
📄 Appendix C – Yamanto Drawings Part 3
Final sheet set for Yamanto, including landscaping and local-access road plans.
📄 Appendix D – Public Notices & Media Part 2
Scans of ads, letters and media releases issued during public display (batch 2).
📄 Appendix D – Public Notices & Media Part 3
Further public-notice clippings and community-meeting records (batch 3).
📄 Appendix D – Public Notices & Media Part 4
Final batch of media coverage and statutory notices for the EIS display period.
📄 Ipswich Council Corridor Report (2019)
Council advocacy brief summarising corridor benefits and calling for joint funding.
📄 Future Rail-Corridor Overview Map (2016)
Single-page A3 map showing the protected corridor over aerial imagery.
📄 Volume 3 – NOT publicly available
Operational methodology draft withheld from the public EIS bundle.
📄 Volume 13 – NOT publicly available
Cultural-heritage assessment lodged separately with Traditional Owners.
📄 Volume 15 – NOT publicly available
Hazardous-materials register and construction risk controls.
📄 Volume 18 – NOT publicly available
Rail-operations environmental management plan marked “internal”.
📄 Volume 19 – NOT publicly available
Draft Conditions of Approval and agency response matrix—awaiting final release.
Disclaimer: This report was compiled solely from publicly available sources—all PDFs, maps and data are linked above for transparency. Most technical details originate from the 2008 Ipswich–Springfield Public-Transport Corridor Environmental Impact Study; no unpublished or proprietary material has been used. While every effort has been made to present the information accurately, we cannot guarantee complete correctness or currency.